Thursday, 10 August 2017

1954 Royal Quiet De Luxe Typewriter

My daughter mentioned that she was going to an antique market in Aberfoyle, On. Just outside of Guelph one day. I mentioned to here that I wanted a manual typewriter.
I had an electric one while I was in University but it was long gone.
She called me and asked if $35 was an OK price.
I think it was a Fantastic price.
This what she picked up.


The has seen better days and was really dusty. I cleaned up the best I could.


Pretty sure it is not meant to travel too much, even though it is portable. I weights a ton.

It does come out of the case.


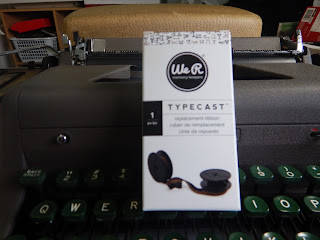
The black ink ribbon that came with it worked but I picked up a Typecast Brown/black ribbon and it worked great.


Now it does not like cardstock weight paper. It just slides around but I am ok with that.
It has lots of features that I am still figuring out. Like the missing #1. I used the lower case "L".


And it goes nicely with my Cocoa Daisy August 2017 Planner Kit.(September planner)

I can't wait to used the kit and do some typing for it.


Saturday, 14 January 2017

Photo Scanner


I really want to organize my thousands of photos and get them into my computer. I have been researching photo only scanners and took the leap today. And well I am very disappointed. I purchased the Brother Image Centre ADS-2000 from Staples today for $426.00 Canadian.

I want a sheet fed scanner to save time.
I have an HP scanner printer but it is a flatbed and it takes forever to scan one photo and I do not want to be splitting photos if I scan a few at a time.
The Brother is nice and fast and does what I want work wise but the quality is terrible.
The colour is way off.

My HP all in one did a much better job but took forever for one scan.
This photo is much more true to colour. Grey vs the blue. Both were scanned at 600dpi.
I will be returning it to Staples as the salesman did say I had 30 days to try it and return it.
Back to my search. I would love to get the Epson Fast-foto but it is $899. If anyone has a sheet fed scanner and has had good results I would love to hear from you.
Marye Anne

Wednesday, 16 September 2015

Planner Project Update

So finally I am posted my update on my Planner Project. It took bit of time to figure out how to film it since my camera is still with my son. I tried my large Nikon but I would have had to hang it from the ceiling to get it to work the way I wanted. It just kept falling off my little tripod. And I was shaky in my last iPhone video. I had to use a box and some tape and a Memento Black Ink Pad to film this. 
My project did not turn out as planned but I did have fun creating it and I will use the stamp sets again. I may just need a larger coil and I can use it as a Planner to keep at home.
I hope you enjoy this video.


Tor order any of the products in this video, please go to my CTMH website.
Keep checking back for more projects and videos.
Marye Anne

Friday, 21 August 2015

Planner Covers

    I have been working on my planners. I have decided to do 2 to start with to see which one will work better for me.
    The Arc binding planner is very easy to update as the pages are easy remove, while the spiral binder has a limited number of lined pages but I can easily add pages that I create myself.


    The first photo shows both of the covers. The paper is Zoe. On the Arc binder I used Modpoge to seal the paper. It does give it a shinier look. I have not decided if I will add any thing else to the spiral cover so I will wait bit before I use the modpoge. I do think that if the paper is untreated it will tear.        You can use a clear transparency as a top cover. The stickers are from the Zoe Complements package.


I drew the lines in for the calendar and used a roller number stamp that I had in my stash for years. I actually like the font a lot and it was very quick to stamp.
It took bit of time to measure out template the way I wanted but creating new pages is very quick.


I really like the look of the graph paper though.

Once the new catalog is released in Sept. I will have photos that are not hiding the new stamps.
Keep checking back as I will update my progress.
Let me know if you have any questions.

Marye Anne


Sunday, 16 August 2015

Planner Project First Video

I have spliced together some short videos to show how I started my Arc planner and a quick comparison to a spiral planner that I am going to create at the same time.
This is my first video that I had to edit and voice over, so it is bit rough. Hopefully as I move along they will become smoother.
I have created some cute pages already but they are with new stamps that are available on Sept. 1, so I will post those right after Sept. 1.

Here goes, hope it works.
Thanks for watching.


Sorry my hands look a lot older than I though.
Yikes.
Marye Anne

Monday, 10 August 2015

The Planner Project

    I have been looking at planners on Pinterest and online way too much lately and I really do need one or should I say want one. I have priced the different ones out and they can become very expensive. I have decided to try and make one from scratch. How hard can it be?

    Well if you grew up before Excel and Word, it can be much more difficult than you think. I tried finding free printables online but then I decided I wanted to do it myself. The problem is that I can not get anything to format exactly the way I want it. One of the big issues is that I want it to be 8.5x5.5 inches in size.

    I had the look but could not get the margins to set up properly. And I really wanted it to be part art journal and part planner so I decided to make it pretty much all by hand.

    There are many different styles of planners on the market but the 2 that I am starting with are the spiral bound and the Arch system. Mainly because I can create additional pages without having to purchase anything new. The Arc system does have a punch(about $49 CDN) that you can get at Staples but I knew that I could either use a hole punch or my Cinch to punch the holes. And of course the spiral will work with the Cinch also.

   The Arc does have different kits that you can buy but I wanted to go with the least expensive. They also have planners and note books. I wanted just the basics, so I picked up the rings and a pack of 8.5x5.5 graph paper inserts.


    The rings are 1 1/2 inch in size. Staples does have a smaller size and I am starting to think that they might have been the better size but the beauty of the system is that you can easily change the rings.
The rings were about $3.69 for a 12 pack and I only needed 8 and the paper was $0.95 a pack for 50 double sided sheets. The graph paper is on clearance but they also have lined paper and more. It is heavier than printer paper also. I did find that I could only add about a 1/3 of the paper at a time to the rings. Plus it came with a thin piece of cardboard which will become my front cover and I did get 2 packs so the one from the second pack will be the back cover.

    This a picture of the start of my planner. I realized once I started taking the photos that I really did need better lighting so I ran out and bought an OTT light. What a difference it makes. I am working on videos of how to punch the pages for the planner and I think the OTT light will help a lot.

    I also have an 8x8 spiral bound album that I will be doing at the same time just to compare the two.

   And I will hint that I have ordered some great new stamps from the new annual catalog from Close to My Heart that are going to work perfectly with my planner. You will be able to see these Sept. 1st. Or if you are a consultant you can see them and order them right away.

    I would love to see other people's planners or have you join me in this project. Post a picture of your planners in the comments.

    If you have any questions please contact me.
Marye Anne